

For the Vancouver Wooden Boat Society, I am teaching a how to make Oars workshop at our new site, formerly the Old Coal House building, now the Wooden Boat Centre at 60 East Columbia Street in New Westminster, BC.
This is how to leather the Oars you make (or buy). I first like to get between 3 to 6 coats of varnish on the oars (not the grips). The oar should be varnished under the leathers. I like to get the leathers on while the varnish is dry but still soft. Subsequent coats of varnish will help “lock” the leathers in place.
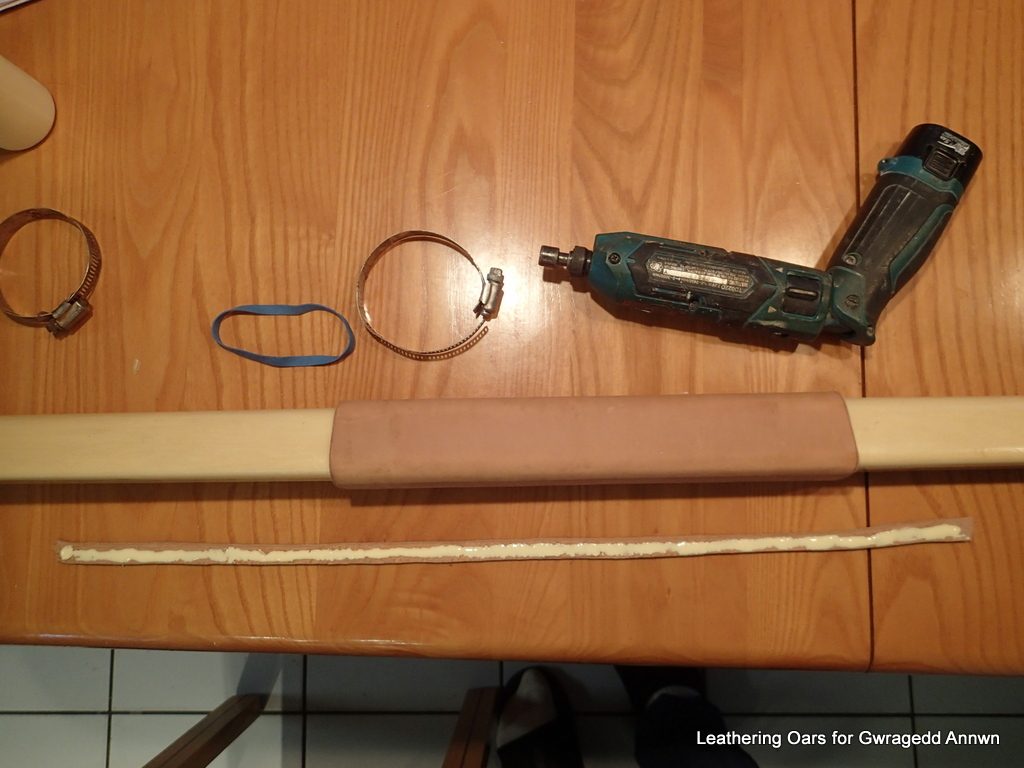
To leather my oars, I used:
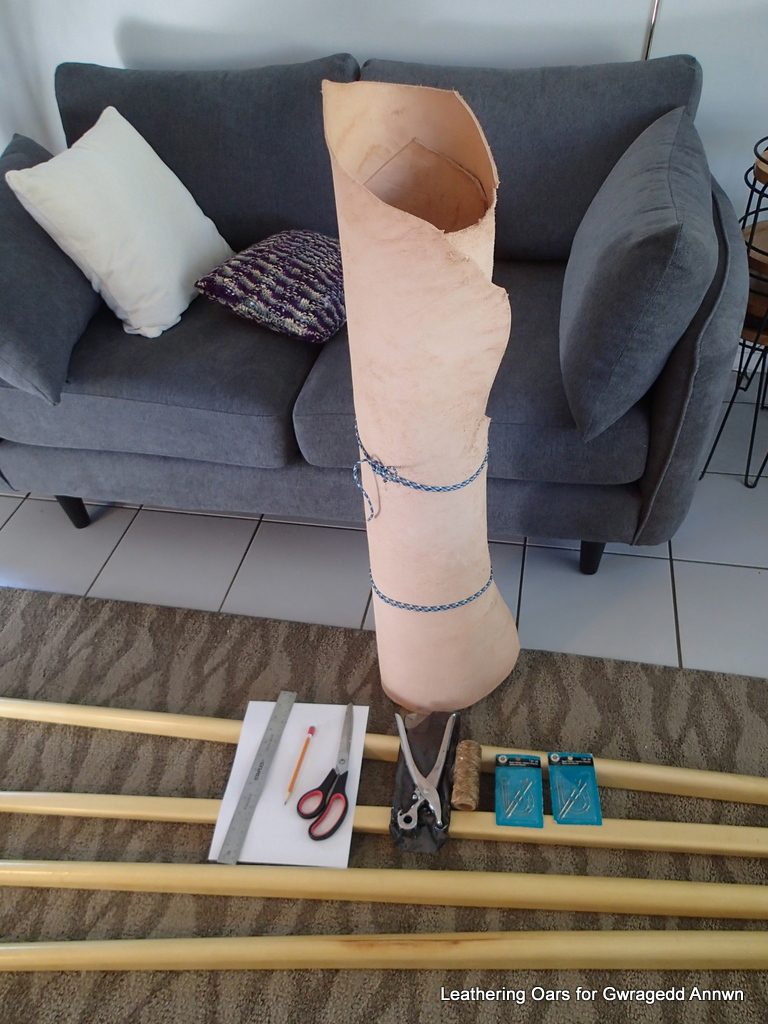
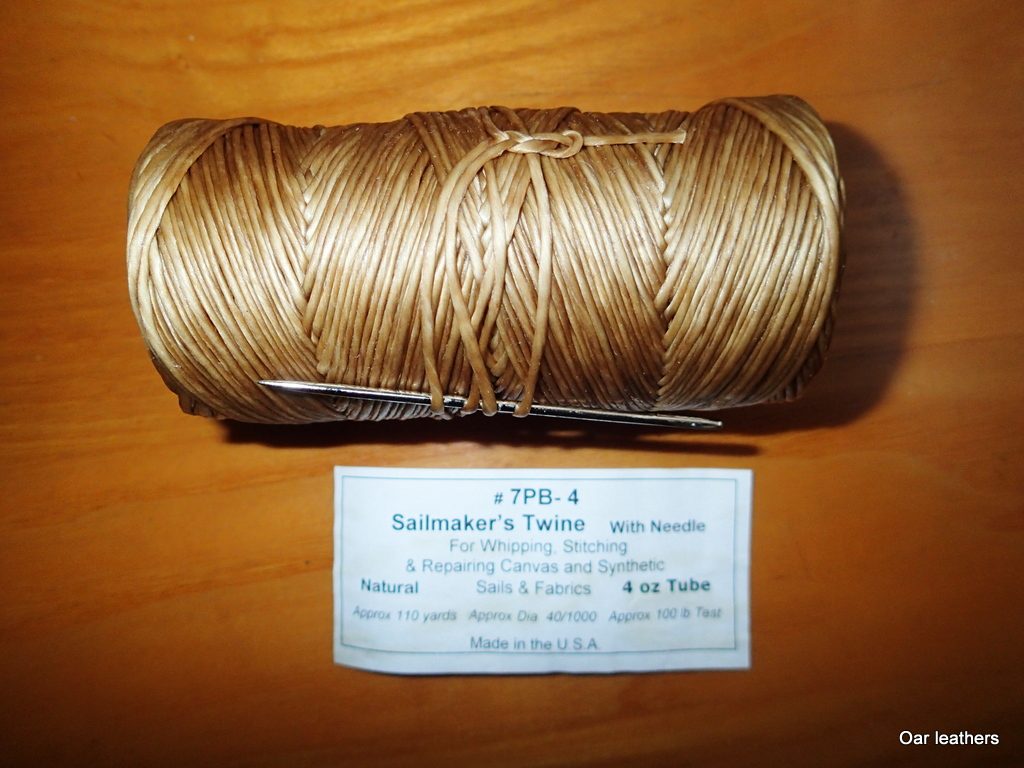
A piece of Double shoulder special 7/9oz Veg-tanned leather from Tandy Leather, four pieces of 8½” by 11” paper for patterns, a ruler, Scissors, a pencil, leather punch, big sewing needles, scotch tape, waxed twine, a 33 cm. by 38.1 cm. Ziploc bag and Snow Guard.
How thick should your leather be? The guiding factor I use is the max diameter plus double the thickness of your leather is less than the inside diameter of your preferred oarlock. In my case, max inside diameter of my oarlocks is 2 5/16″. The diameter of the oar at the leather is 1 7/8″ plus two times the thickness of the leather (1/8″) is 1/4″. This gives me a diameter at the leather of 2 1/8″. I will have 3/16″ of “wiggle room” at the oarlock.
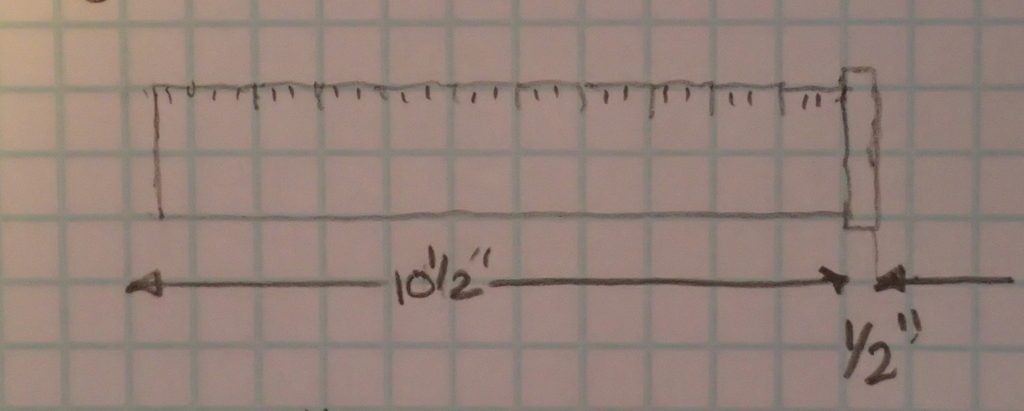
Step One: you measure your oars to determine where your leathers should go. The measurement you begin with is the distance between your oarlocks. There are many oar placement formulas out there. I use the Phil Bolger’s recommended method. Bolger wanted his oars to just clear each other at the boat centreline with the oars horizontal and eight twenty-fifths of the oar length inboard of the oarlock. I usually like to leave a little less so I never smash my thumbs together (I have a bit of a bad habit of locking my thumbs over the end of the handle of the oar while rowing). I want my oars to be at the 8/25th from the grip (or 17/25th mark from the tip of the blade) mark on the oar. This is where I put my button. This means that when I push my oars down to the button, I am at the 17/25 gearing spot. I can bring my oars inboard to reduce gearing, but I cannot put my oars further out to increase gearing…I can only make it easier to row. I am fine with that. I am not very good at holding my oars in the oarlock at the right spot …that is why I put my button where I want my oars to sit.
The Key Factor is to put your buttons wherever you want, as long as the rowing feels good to you. The rowing gods will not send lightning to strike you dead if your buttons are not exactly at 8/25ths of the length of the oar! These are Your Oars, so do what works best and feels best for you.
If you are good enough at rowing to be able to hold your oars where you want them at the oarlocks, you can may not need a button at all and you should centre your leathers on the 8/25th mark, so you can gear up or down as you row.
Now in all honesty, I never change my gearing. My leathers could be only slightly longer that the width of the oarlock “horns” or “arms”. To protect the oar the leathers would only need to be an inch or two long, but, that does not look right. If you are going to change your gearing while rowing, you need a leather that is long enough to do so, so no matter what your gearing is, as long as you are rowing on the leather on your oar. Bolger shows his leathers as being 6″ long (Small Boats, International Marine, 1973, pg 30 & 31) …Some other authors go a long as 14″. As long as your leathers protect your oars from wear at the oarlock, the length is an aesthetic decision you must make. Whatever looks good to you. I am an 11″ leathers man myself.
The longer the leather, the less likely the leather is to slip on the oar.
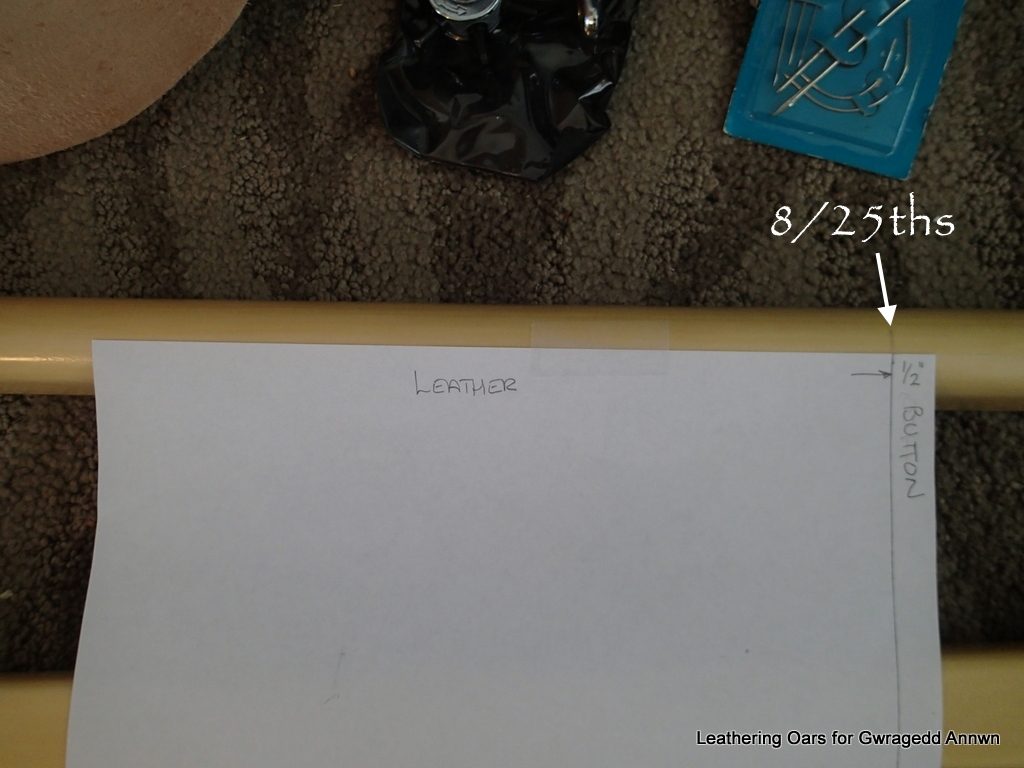
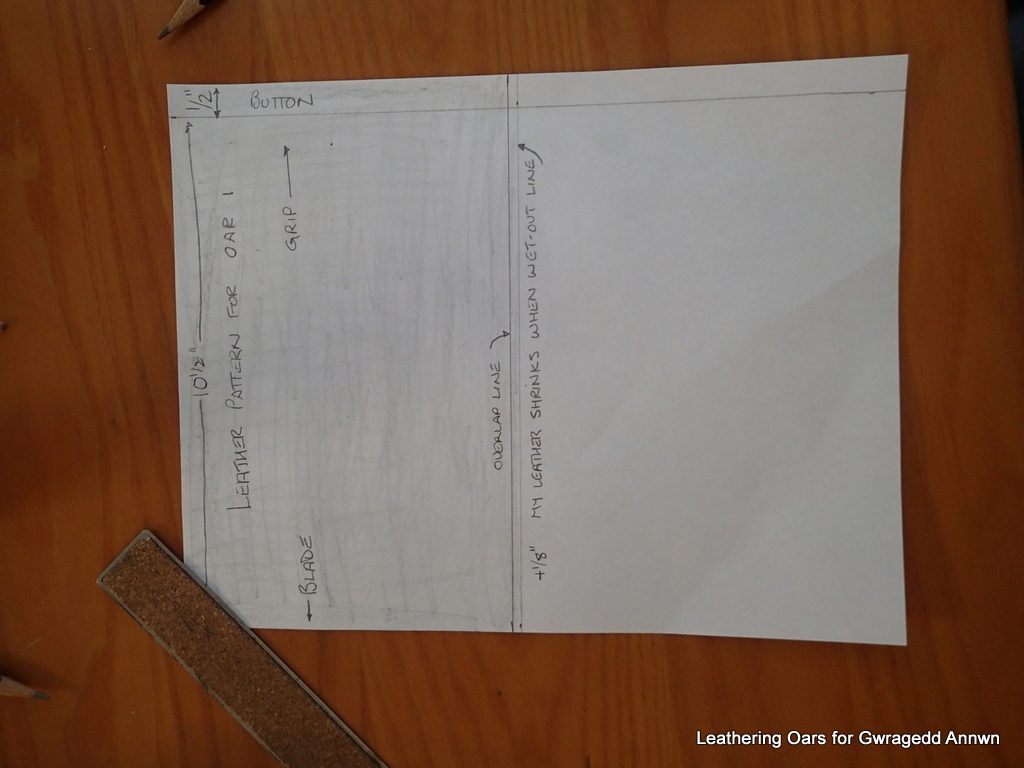
Step Two: I am Using a 8½” by 11” piece of paper for a pattern, so my leathers are 11″ tall by the circumference of the oar. The circumference measurement is dependent on how much your leather shrinks or expands when wet-out. Take a test piece of leather (say 6″ by 6″) let it soak overnight and remeasure it to see how your leather changes when wet-out. If the leather expands when wet, deduct the extra so you end up with a ⅛” to ¼” gap. If the leather shrinks when wet, add to your measurement so that you still get a ⅛” to ¼” gap. On your paper pattern, mark where the button will be. Tape it to the oar with the button mark ½” past the 8/25th mark (where you want your oarlock to be). Mark on your paper pattern where the paper overlaps. Mark where the paper ends on the blade side, so you know where your leathers will go.
Another trick you can try is to use a strip of your leather (say the ½” by 18” strip for the button) to determine the around the oar measurement. This will allow for the thickness of the leather.
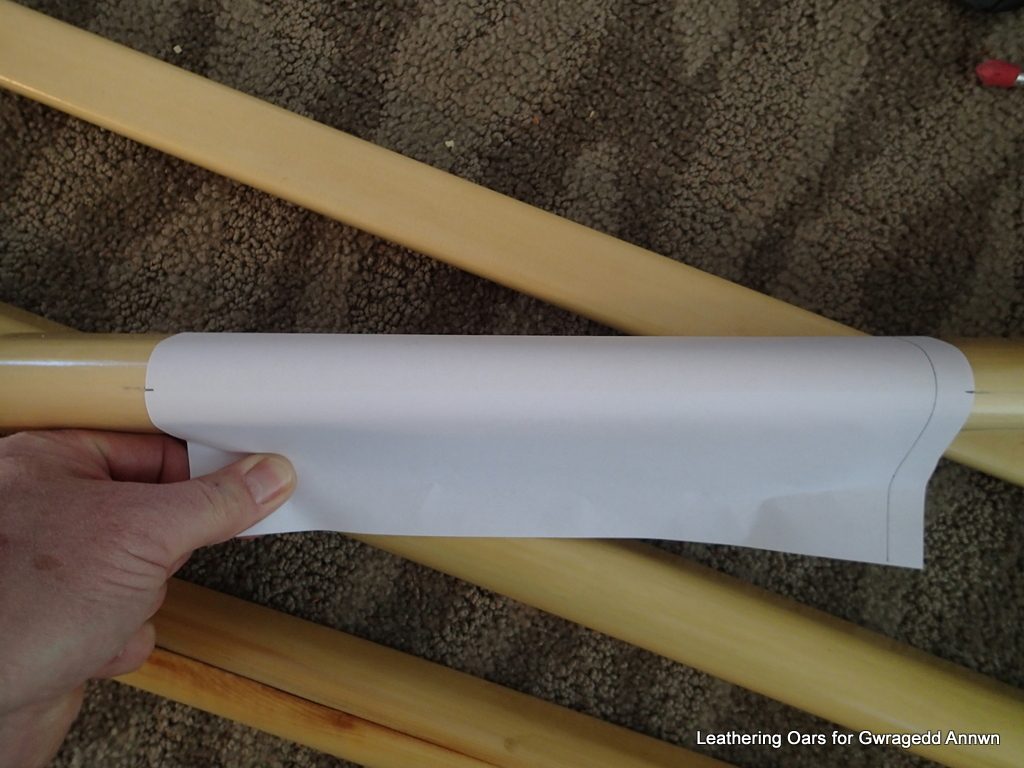
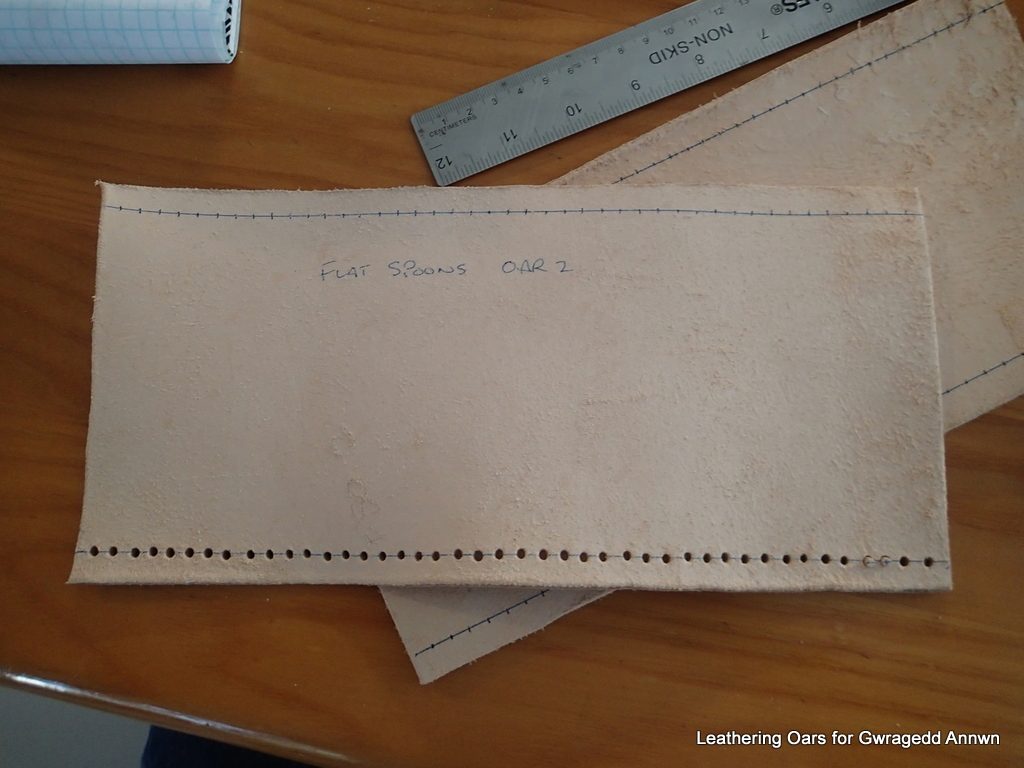
Remove the paper, draw a line to connect the two marks. Draw another line, ⅛” to ¼” further in from the first line. You want your soaked piece of leather to be ⅛” to ¼” smaller so you will have a gap that you will later pull tight. ( ⅛” to ¼”? how stretchy is your leather when wet?) Cut out the pattern. For my flat blade spoons this is 11″ by 5¼”. My button will be a strip of leather that goes twice around the oar, about 11″ long. A word or two about buttons. I use my button to help hold the oar at the correct (for me) spot at the oarlock. Two wraps of leather is fine for this. If you want your button to keep your oarlocks on your oars, say with Scotty strongbacks or any round oarlock designed to stay on the oars, you must make sure that the button stands proud enough to keep the oarlocks from falling off of the oars at the grip. Your button may have to do two jobs, oar placement and oarlock retention.
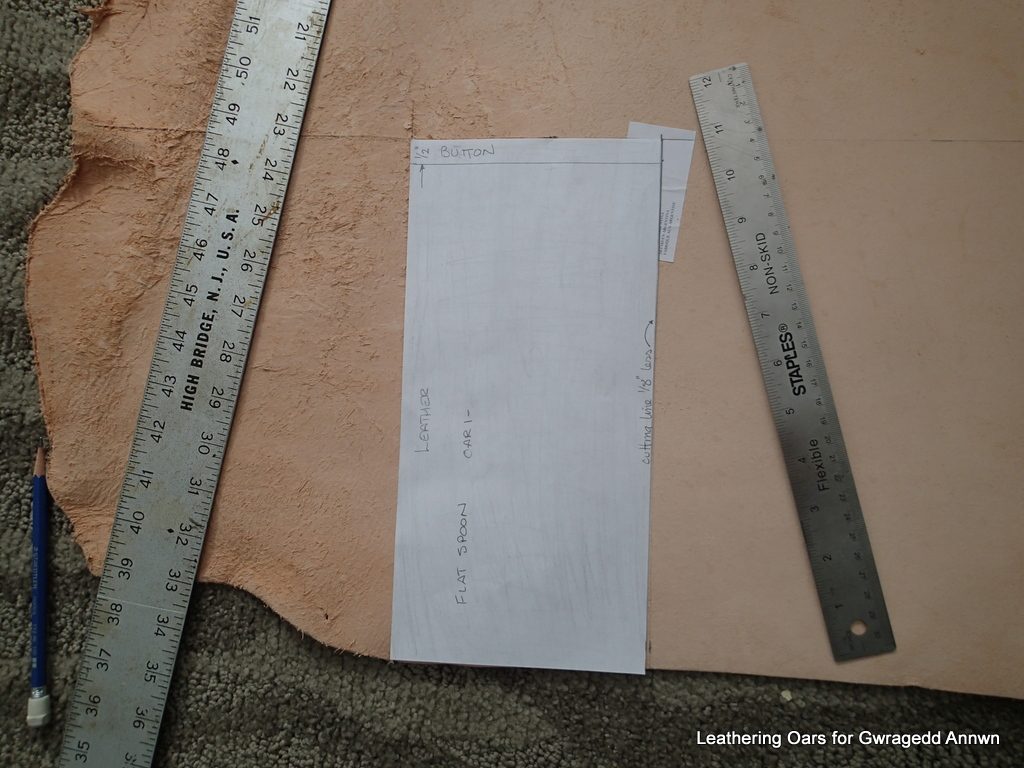
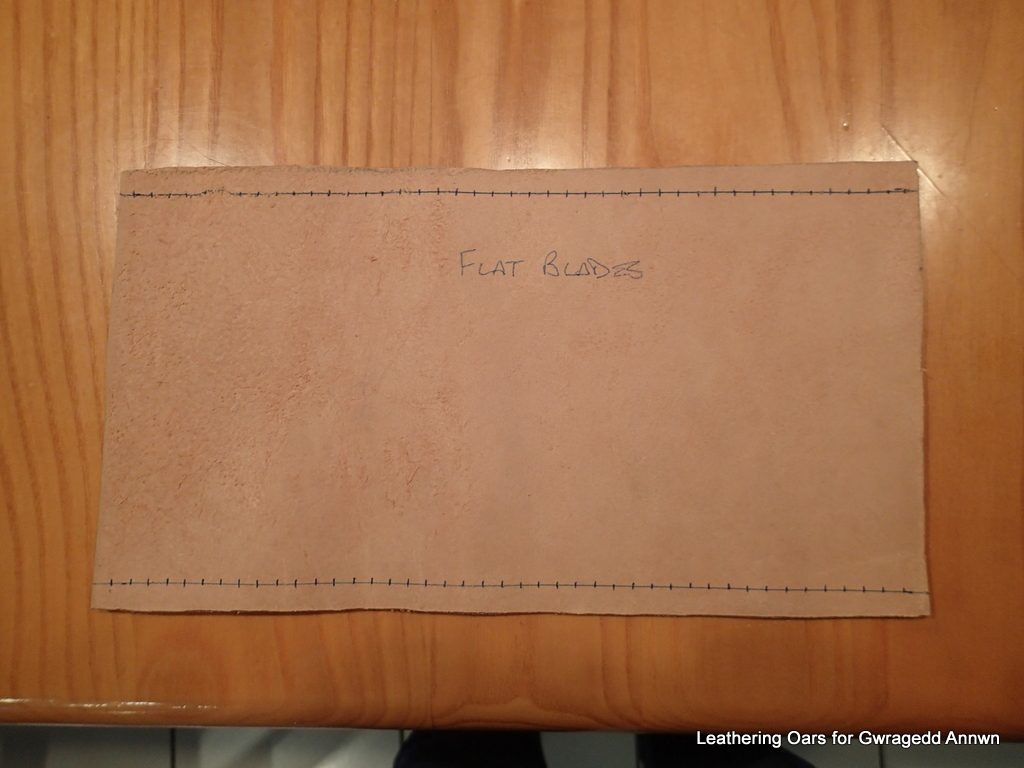
Make a paper pattern for all of the oars you are going to leather. Transfer the pattern to the leather. With my leather, I draw a line 11″ from the bottom of the piece. using the paper patterns, I mark on the leather where to cut.
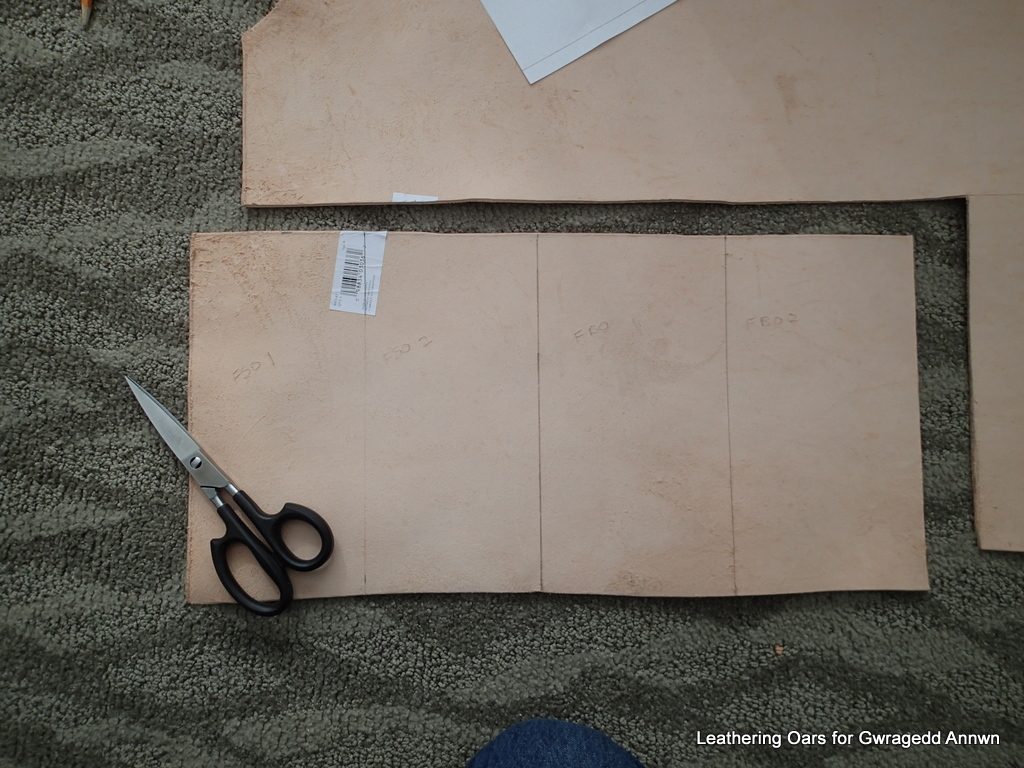
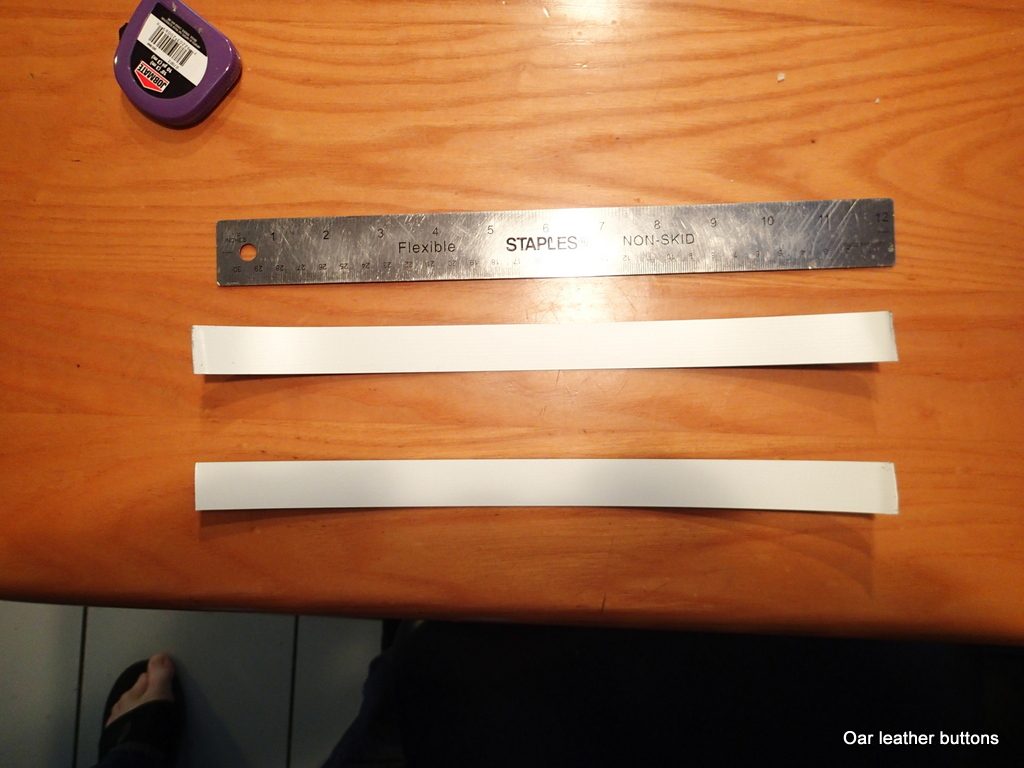
I have four ½” strips at the beginning and four 11″ by the circumference of the oar less ⅛” (I am not going to stretch my leather much).

Using a pair of heavy-duty scissors, I cut the patterns out.
I find that it is too hard to just sew through the leather so I punch holes to sew through.

Step Three: On the rough side of the leather, I draw a line at least a ¼” in from the edge and mark the lacing holes every ¼” . You can use whatever measurement you want, just end up with an odd number of holes. Every 10cm would work just as well. I would not go any closer than ¼” as when wet, the leather is soft…do not want it to tear.
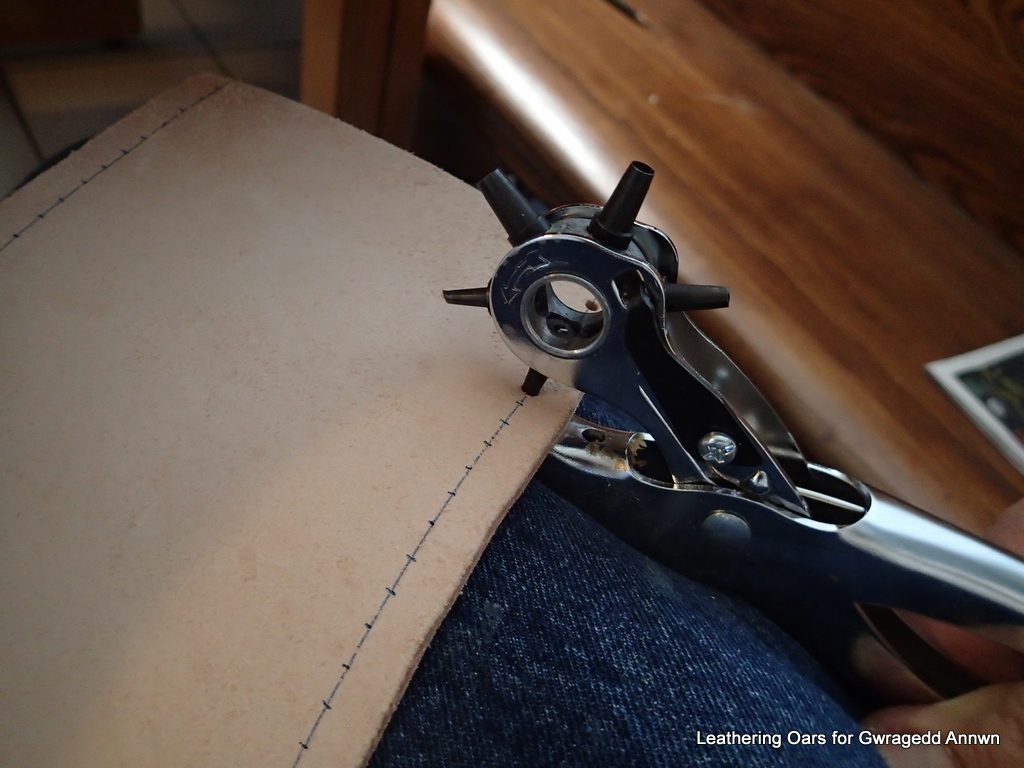
Punch out the holes…obviously, the longer the leather is the more holes to punch. I have never tried drilling them out. If you do not have a punch, I suggest that you buy one when you buy your leather…Talk to the sales clerks, and tell them what project you are working on. They may have some good suggestions for you.
Step Four: Having punched all of the holes, I put the leathers and button strips into a large (33 cm. by 38.1 cm Ziploc bag and add water…
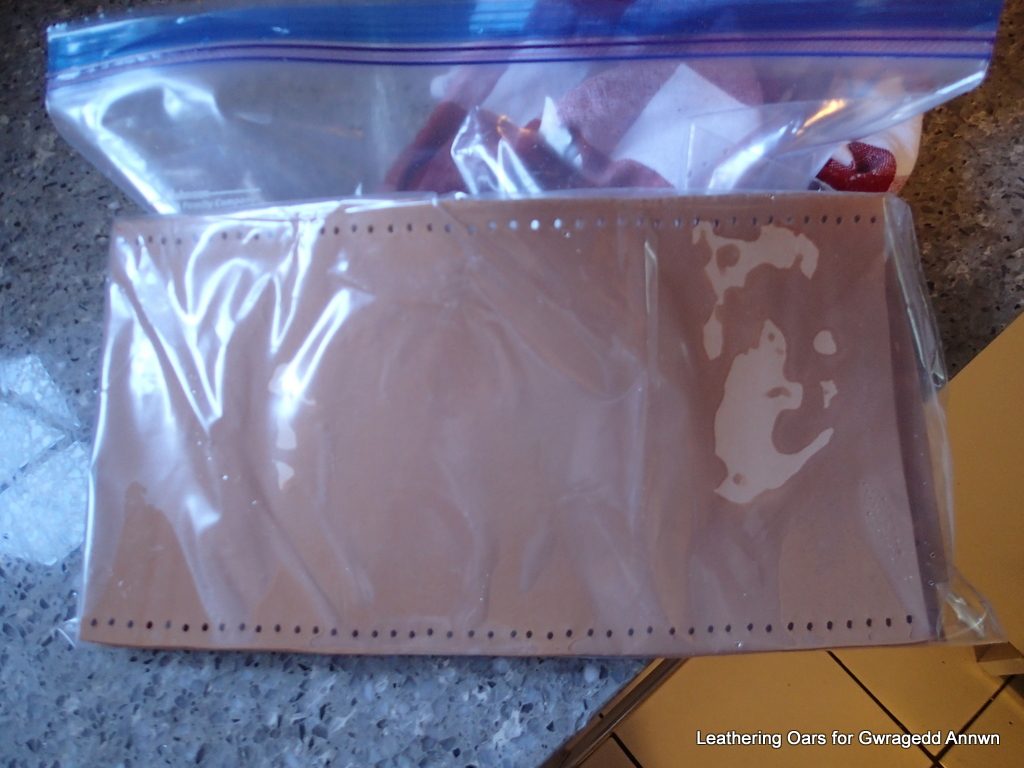
I will let the leather soak overnight (however, an hour will do). I use room temperature water NOT hot water! Hot or boiling water will make the leather hard and unworkable.
A couple of extra tools may be helpful. A pair of pliers, a corkscrew and two small diameter wooden blocks (I used the cut-off grip ends of my oars from when I cut them to size).
When completely saturated, my leather went from 1/8″ to 3/16″ in thickness!
Another way of cutting your leathers to size is to cut the leathers Oversize, say 11″ by the circumference plus ¼” (bigger than your oar circumference!). Mark the holes ¼” on a line ⅜” from the edge. Do not punch the holes, soak the leather first. When the leather is saturated, remeasure the oar and then cut the leather to fit. If you have to cut the leather on the long edge to fit the circumference with a ⅛” gap, use a sharp knife and a ruler (on a breadboard). Now punch the holes on the ¼” marks, ¼” from the edge. I found wet leather easier to cut and punch than the dry leather.
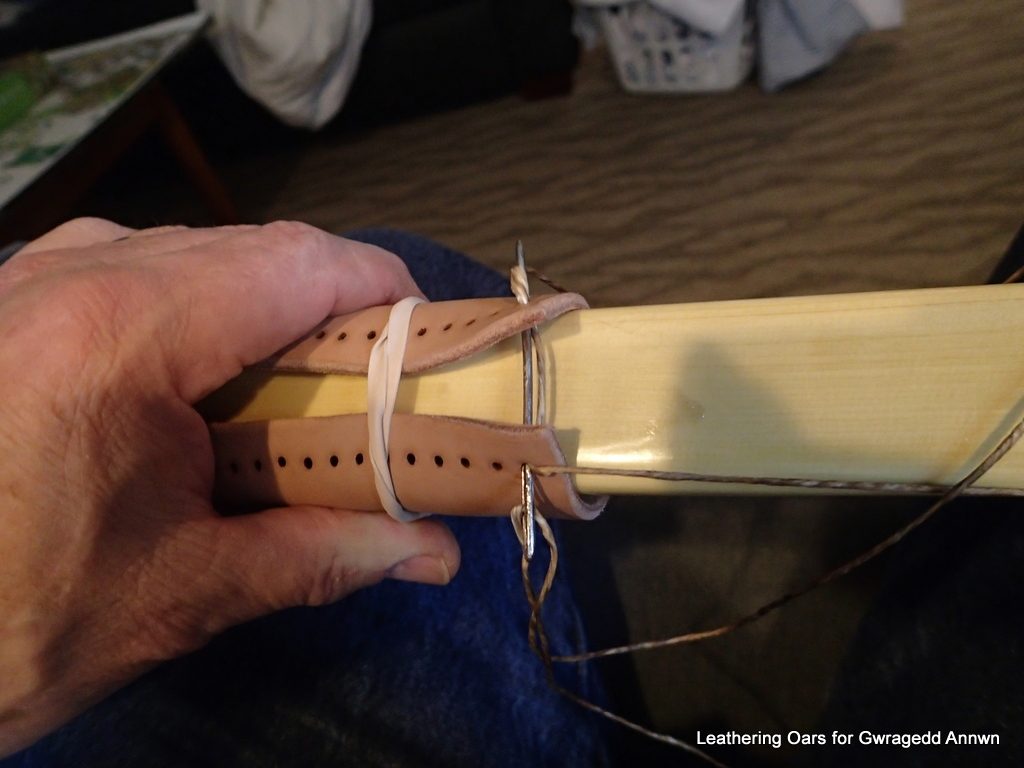
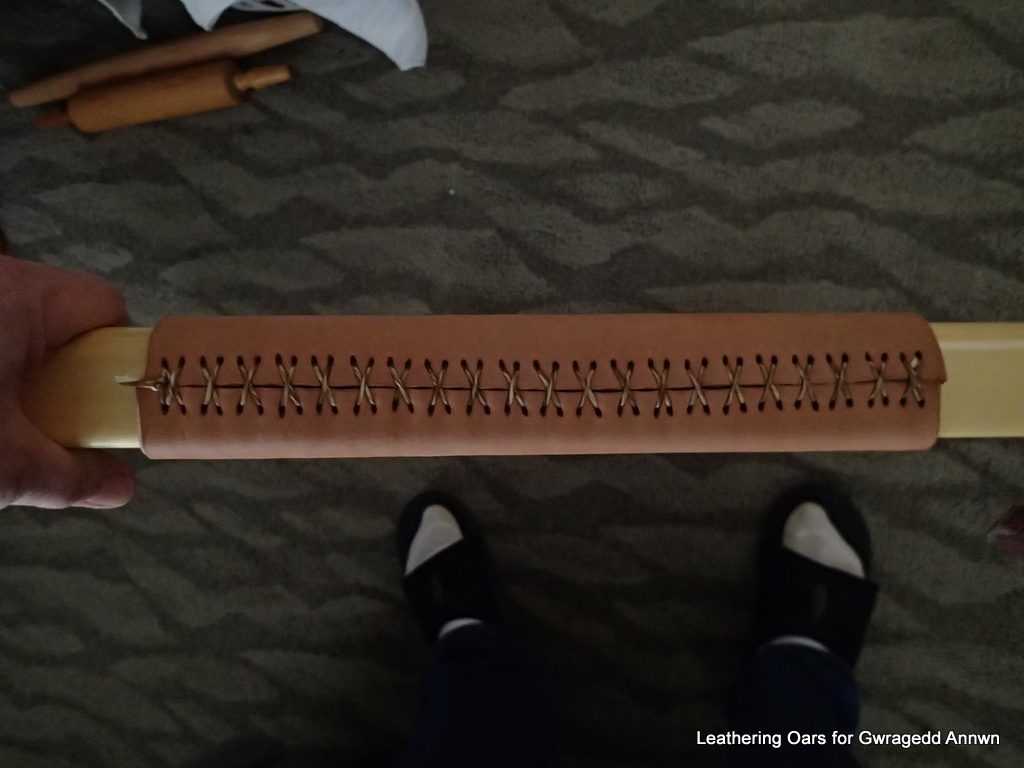
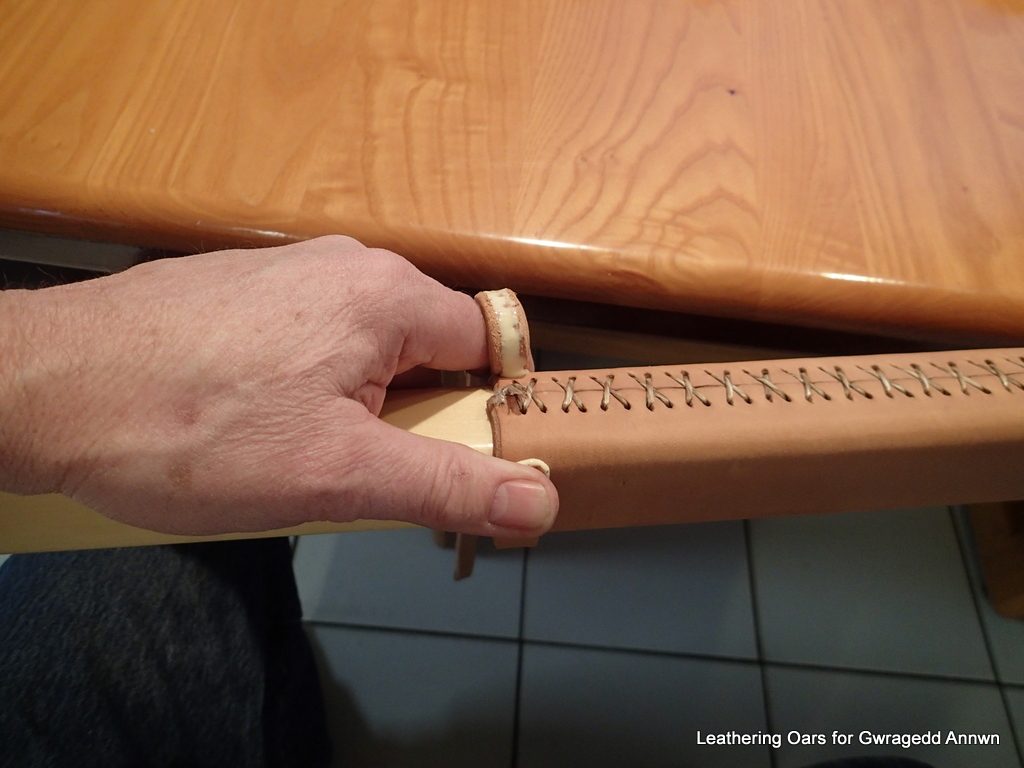
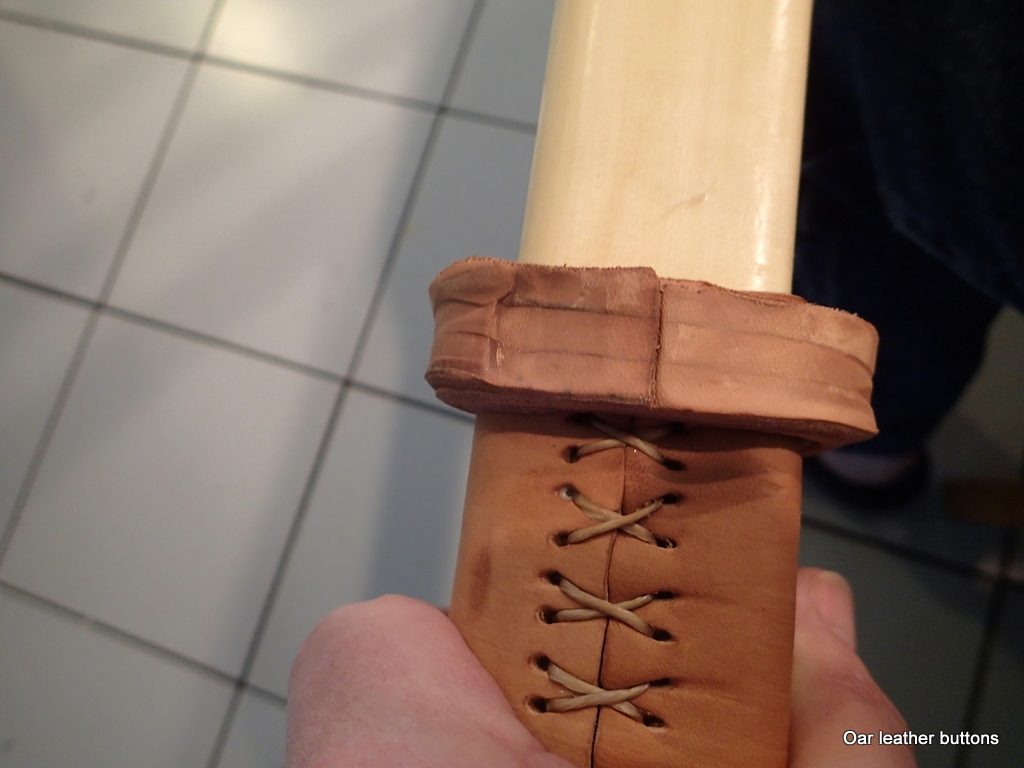
First stitch at the Blade end of the leather.
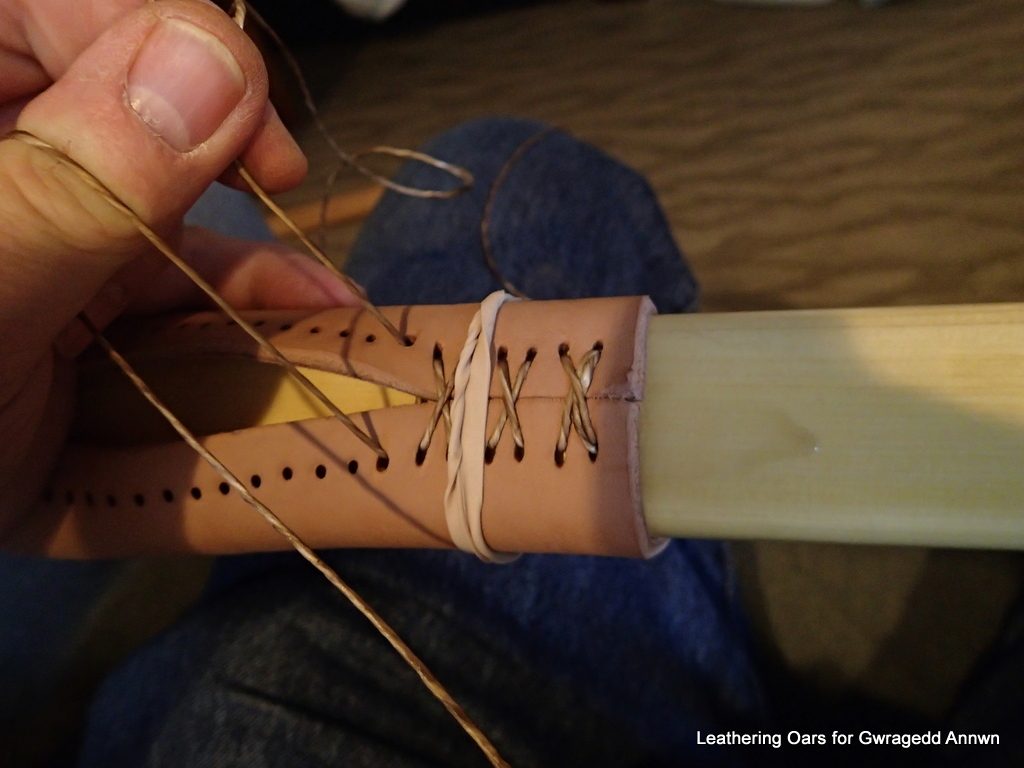
Step Five: With the leathers thoroughly soaked, I begin to sew them on. I have the 8/25th point (where the oarlocks will be on the oar while rowing). I put the leather there and start sewing from the Blade end up to the grip end. This way I will finish at the button end of the leather and the button will cover where I tie the threads together.
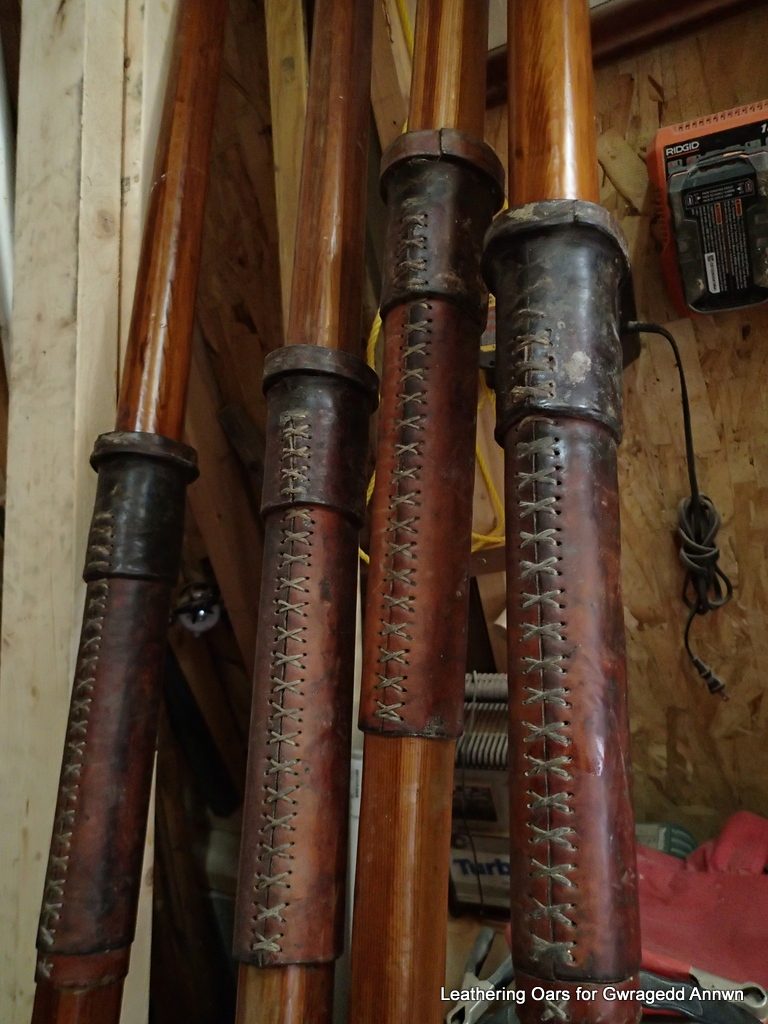
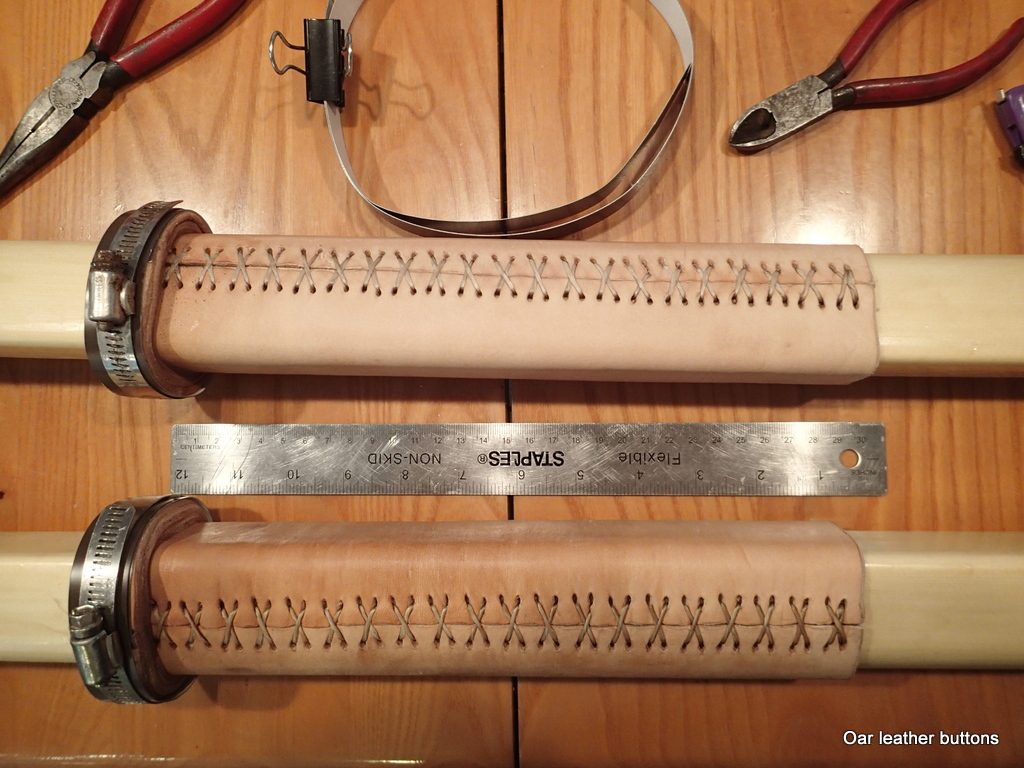
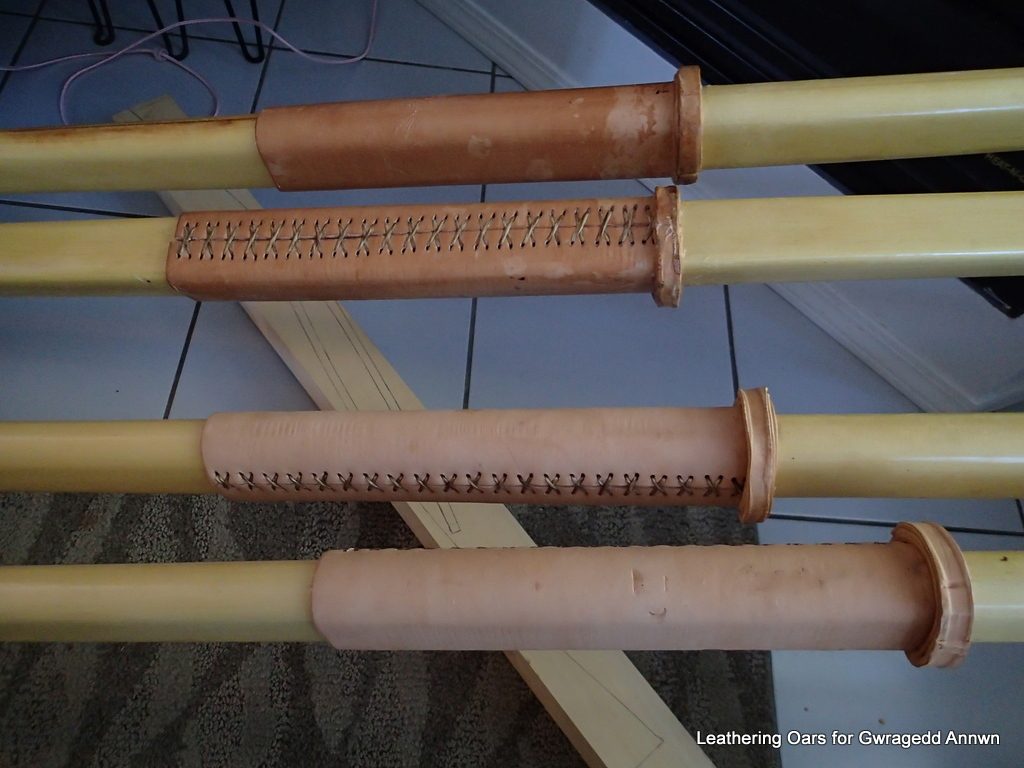
Now the big question! Stitches Up? Down? on the front side? on the back side? I think that this is mainly an aesthetic consideration. Gwragedd Annwn’s spoon oars (with over 1500 nautical miles on them) have the stitching resting against the oarlock. The oarlock “wears” on them with every stroke. No issues so far. I use fairly thick ⅛”+ leather and perhaps the stitches settle deep enough into the leather so the stitching does not wear.
For the flat spoons I have made, I am putting the stitching “Up”, where they should wear the least against the oarlock. I will be able to see the stitching with every stroke. I will see how it looks and if I like the look.
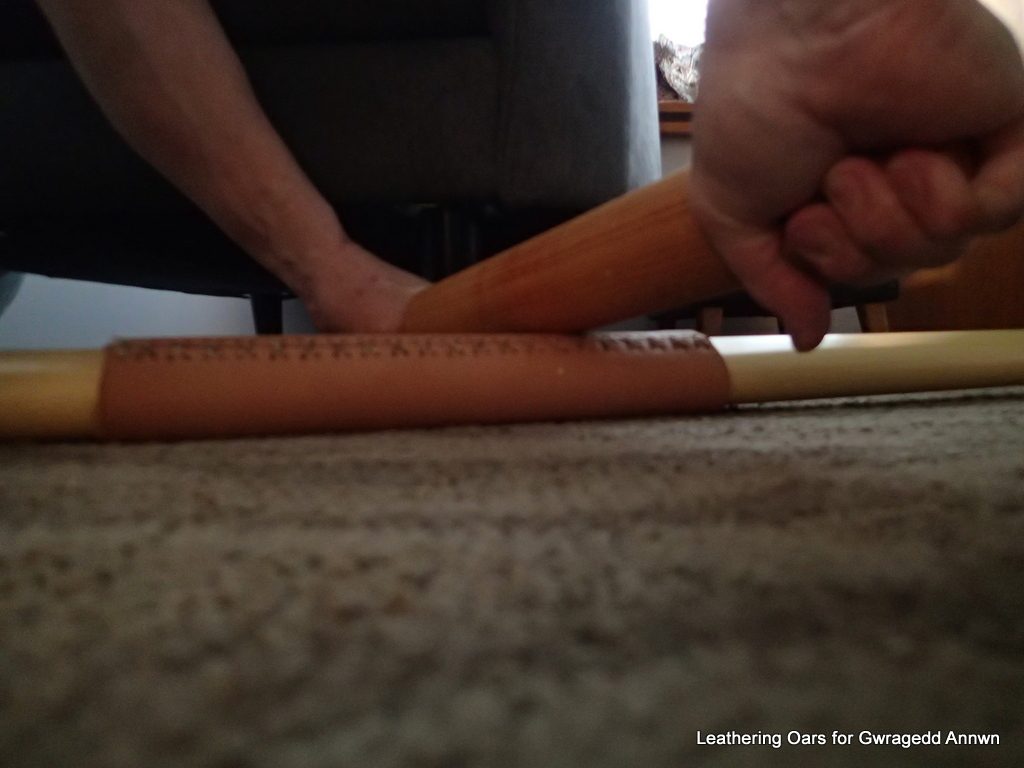
After I have leathered the oars, I take a rolling pin and roll out the leather. This helps the leather to fit tight to the oar and helps seat the stitching.
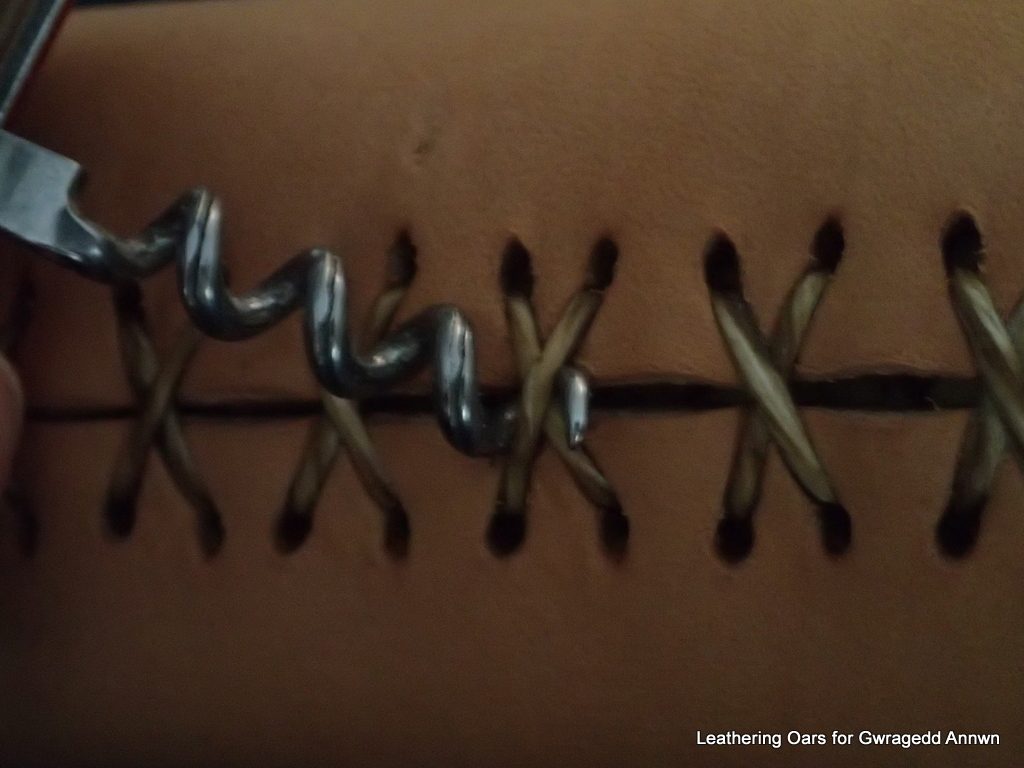
If the stitching is a little loose, I use a corkscrew (on my Swiss Army Knife) to pull it tight.
For the flat blades, I will put the stitching on the bottom (power face) side of the oars.
If you need to get more tension, wrap the lacing around a block and pull. If you are having trouble with pulling/pushing the needles through the holes, use a pair of pliers to pull the needles with.
Step Six: Buttons, Buttons, where do the buttons go?
Since Gwragedd Annwn is at home, I took my newly leathered oars out and put them into the oarlocks, sat in the boat and made sure that my thumbs had clearance. I marked where the buttons should go. I had measured right.
I took the 18″ by ½” strips of soaked leather and cut bevels in the ends with a sharp knife. I patted them dry with paper towel. I gave them a tug to stretch them. If you are using your button to keep “Captive” oarlocks on the oar, make sure that you have a long enough piece that when wrapped around the oar stops the oarlock from coming off of the oar….Oh, and now is the time to put the oarlock on! If you are using Scotty Strongbacks, make sure that the flat side of the “P” will be on the forward side of the oar. You want to be rowing against the pin. If you are using symmetrical captive oarlocks, any way will do.
I laid the strip next to the oar and spread a line of Titebond II glue down the centre of the strip.
I then wrapped the strip around the leather at the end with the end knot.
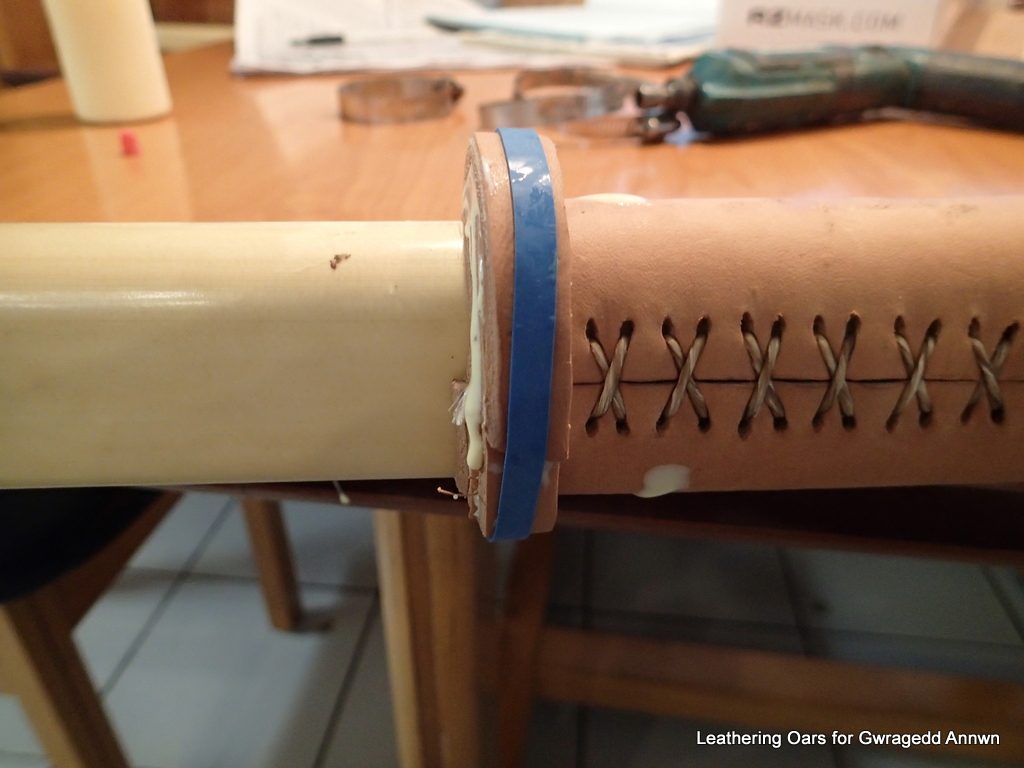
I secured the wound strip with a thick rubber band. I turned the button until the beginning end and the ending end were opposite each other.
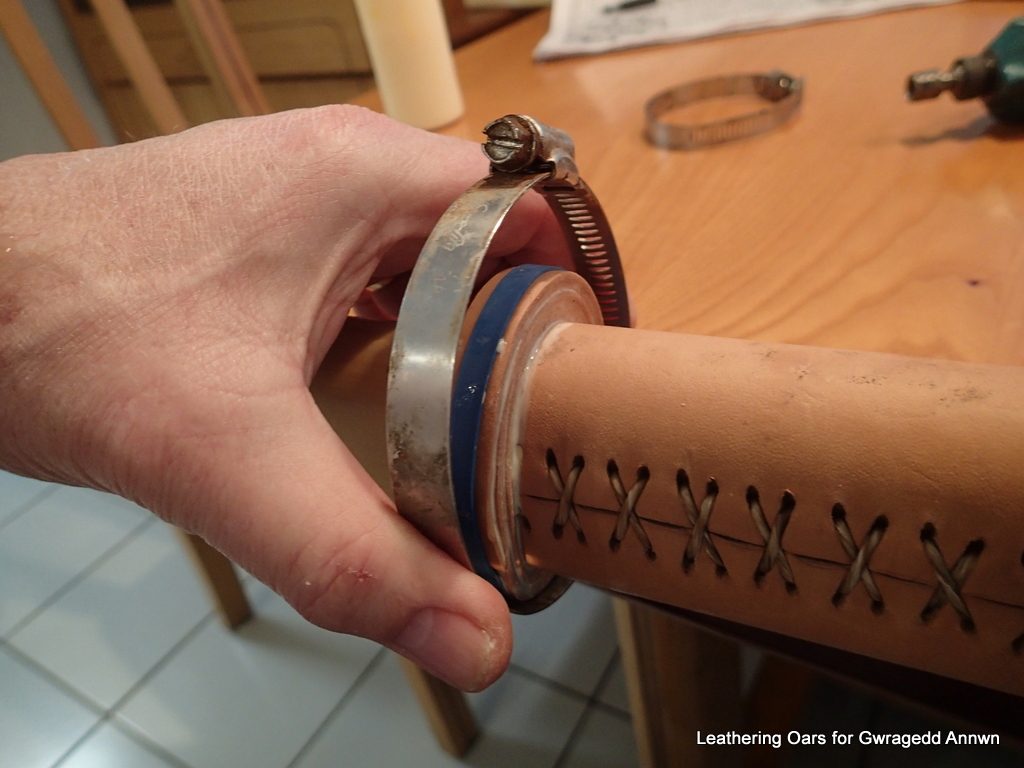
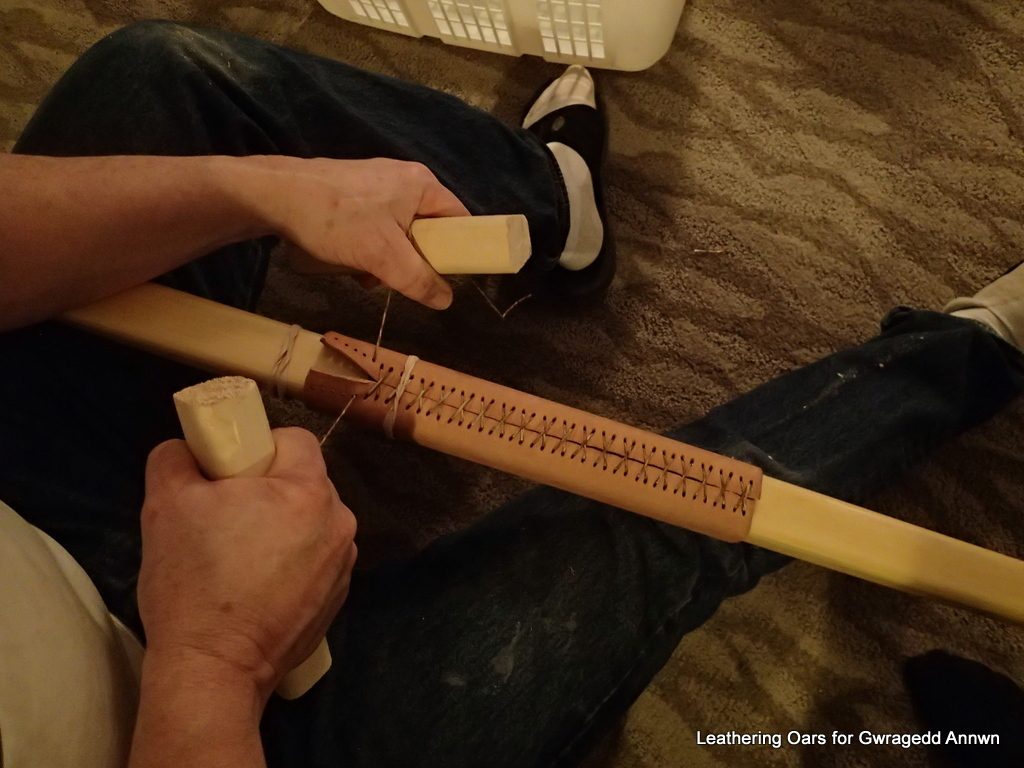
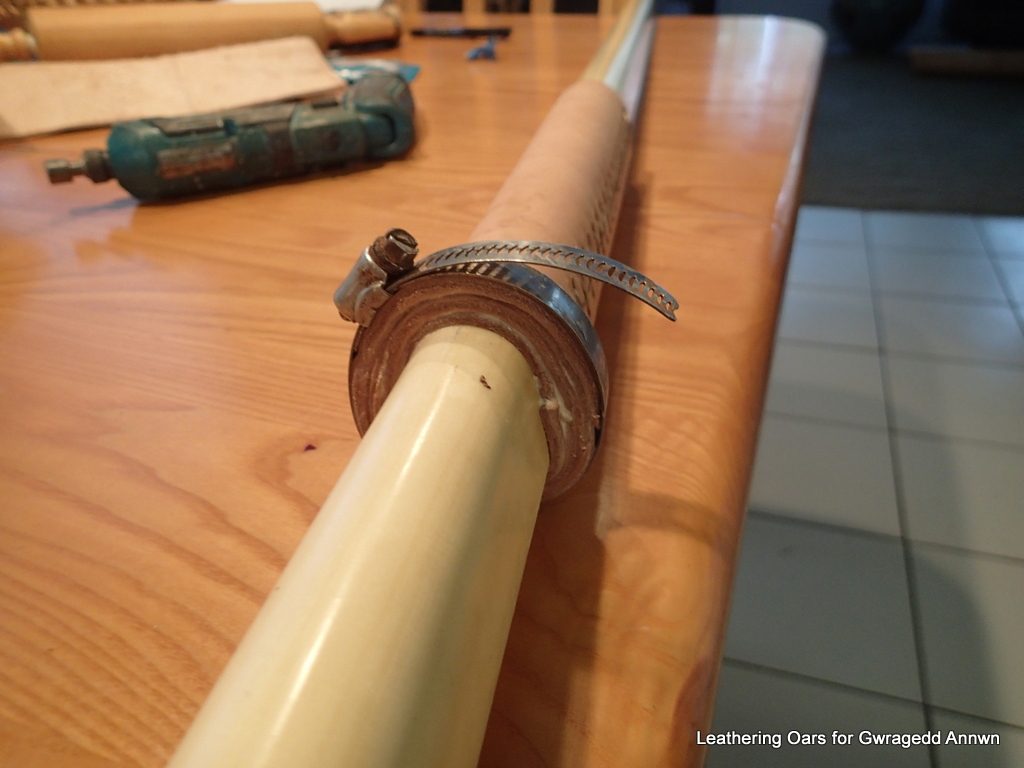
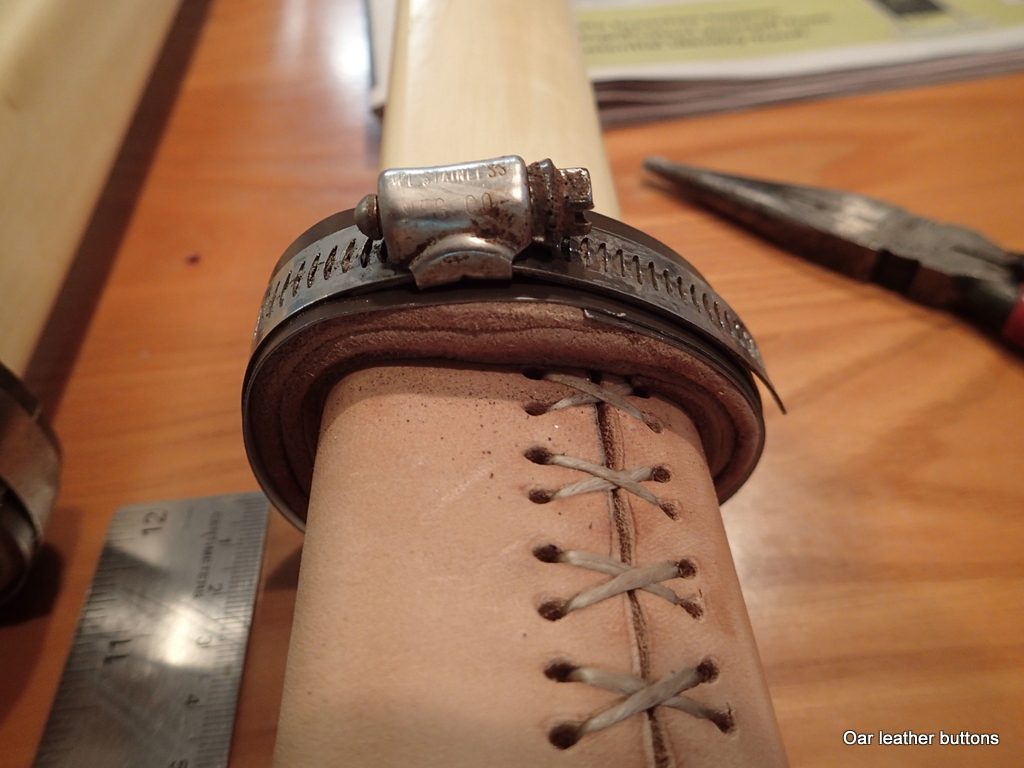
I then took a hose clamp and used it to clamp the button loosely . Make sure that the layers are on top of each other. Tighten. If your button shape distorts, undo the clamp and re-align. The blade side of the button should be the straightest.
Step Seven: Wipe off excess glue and put aside and let dry.
If your hose clamps are not wide enough and leave a mark on the button that looks like this (and you do not like the look):
There is a fix for this…it uses a piece of 1″ by 12″ sheet metal flashing. I bought mine at the hardware store. You need one strip for every button. You can also use a piece of cut-up 1 litre pop bottle.
The method is to use the hose clamp to “clamp” the button, squeezing out all of the excess glue/water then take off the hose clamp, wrap the button with the flashing strip and re-apply the clamp. Tighten.
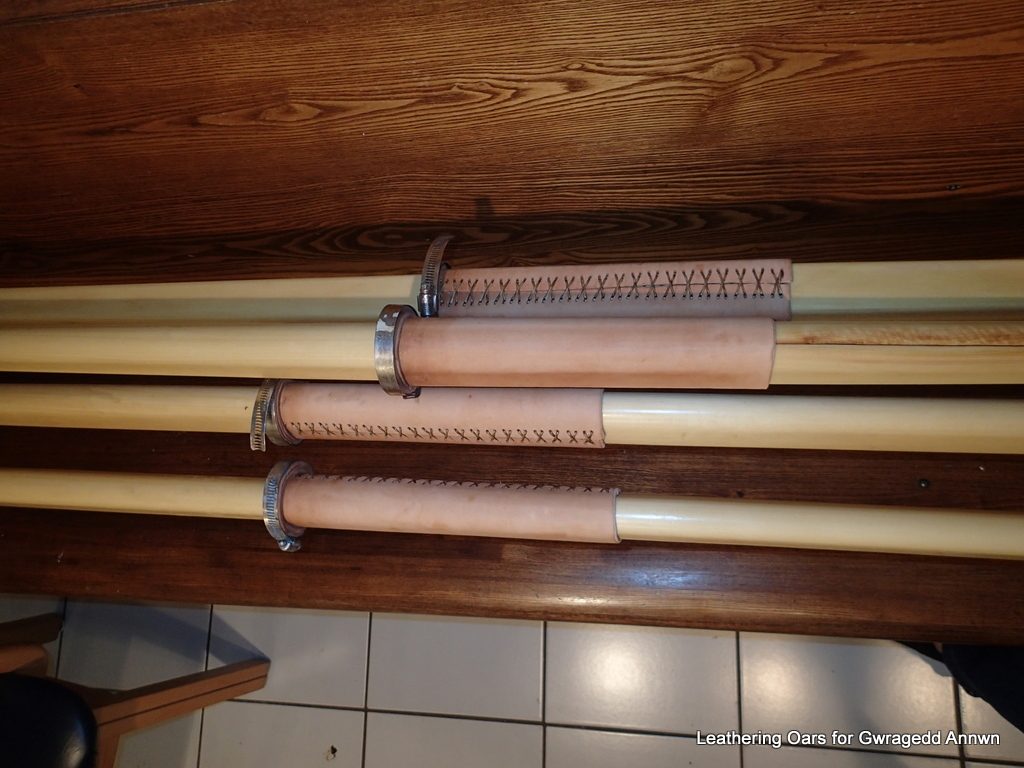
I do the same for all of the oars. The leather will shrink as it dries.
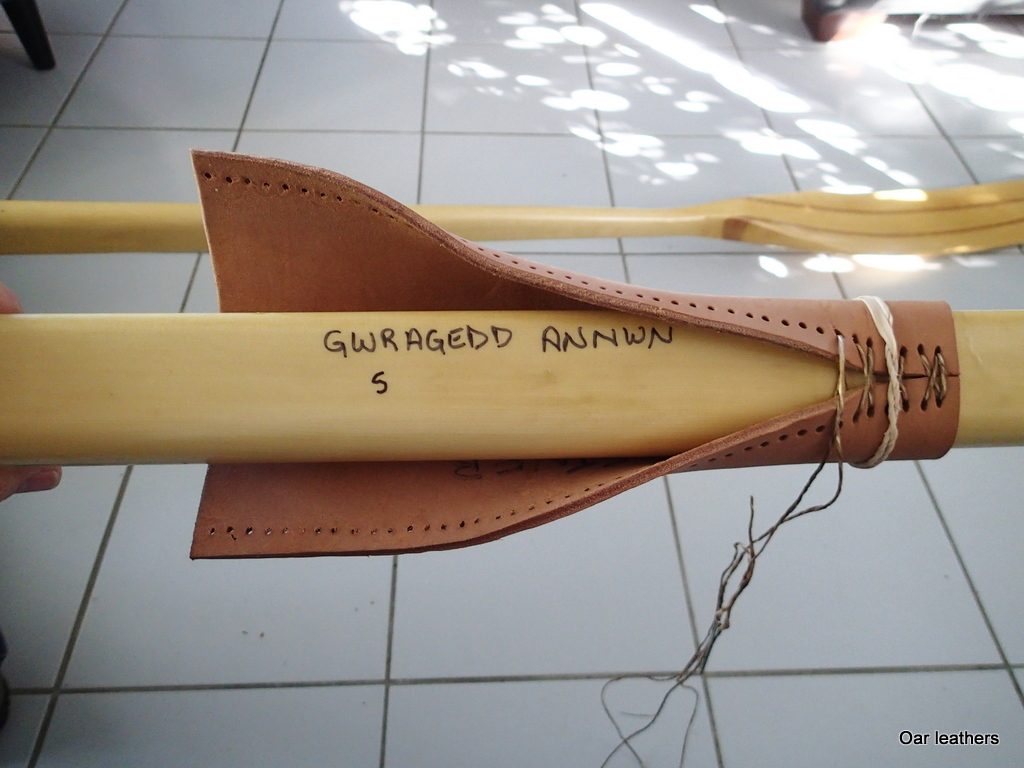
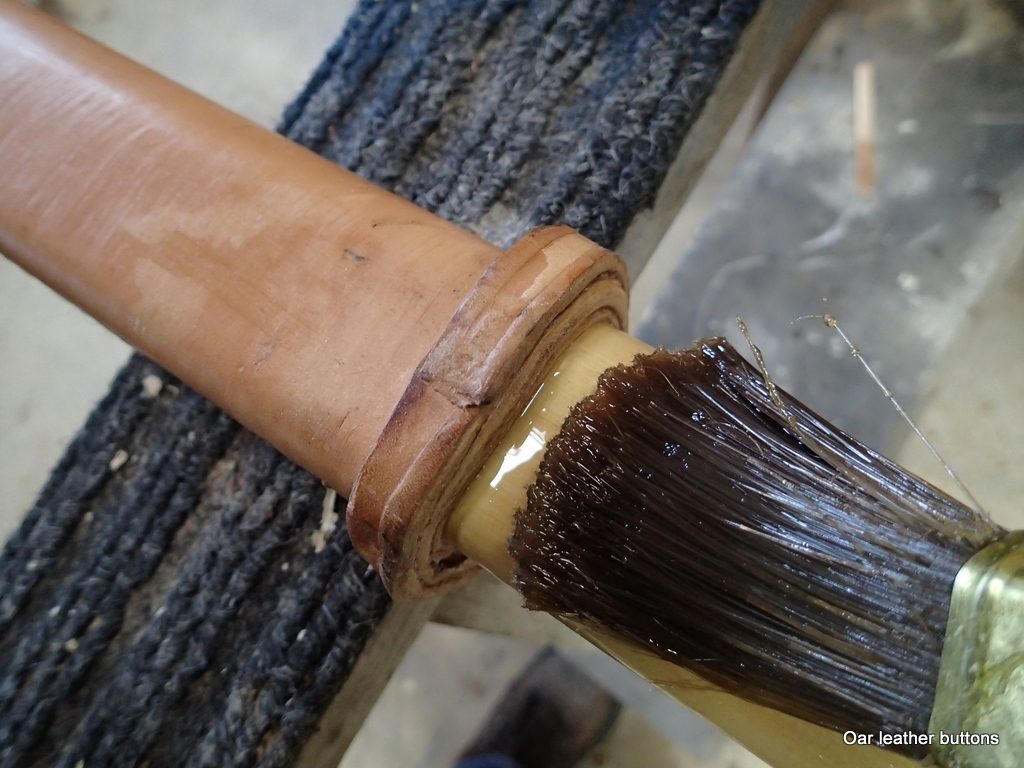
Step Eight: When the leather is thoroughly dry and warm, I rub Snow Guard into them to seal, waterproof and protect the leather. Put the oars somewhere warm (in the sun) for the Snow Guard to soak into the leather. In cold weather, I have heated the leathers with a Hair-Dryer to melt the Snow Guard into the leather or left them by the fireplace.
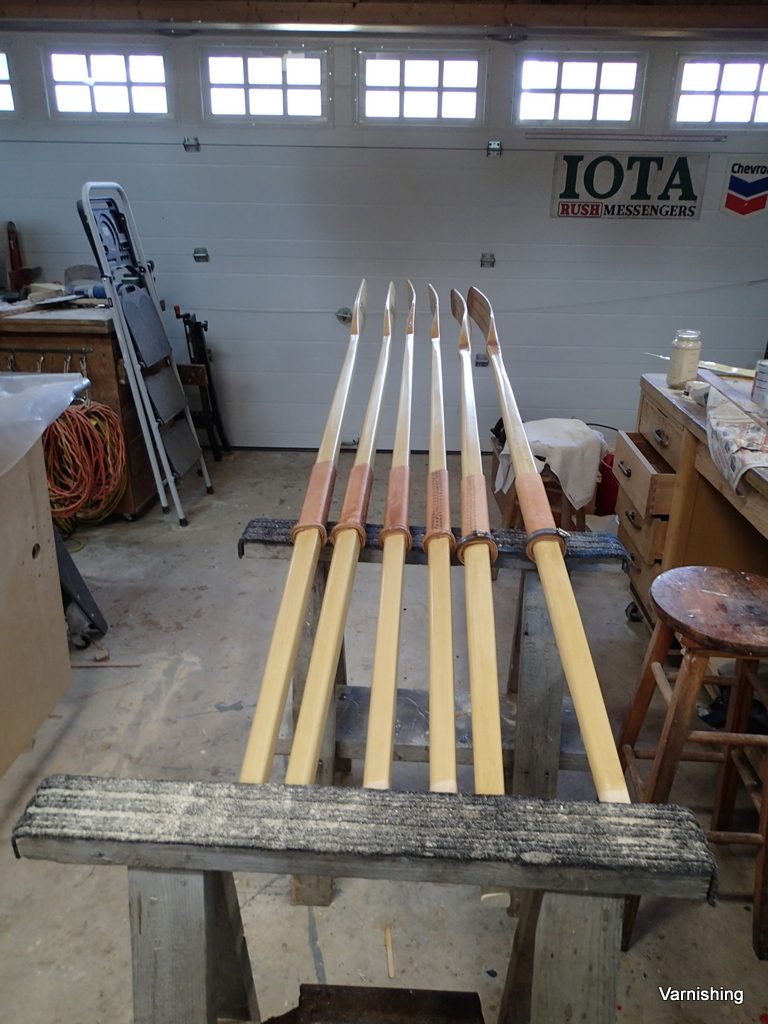
After the Leathering is done, I put some more (to total at least 12) coats of varnish on the oars. The additional coats will help “glue” the leathers in place.
Varnish right up to the leathers…varnish seeping under the leathers, locking them in place.
Step Nine: Go Rowing!!!
Mike
